10 Easy Steps to Building an Interface
Point, Click, Drag & Drop Your Way to Systems Integration with the Enterprise Integration Console (eiConsole)
The rapid creation of end-to-end interfaces is supported in the eiConsole following an “Assembly Line” approach using a combination of configuration screens, an intuitive Data Mapper and File-to-XML Editor.
Step 1 – Select the Interface
The eiConsole Route File Management Screen (Example 1) provides a single place from which to manage all of a company’s interfaces. When an existing interface is selected, or you click “New,” a graphical representation (Example 2) of that end-to-end interface is presented with all of its configurable components. Components of the interface include the Source System, Listener, Source Transform, Route, Target Transform, Transport, and Target System.
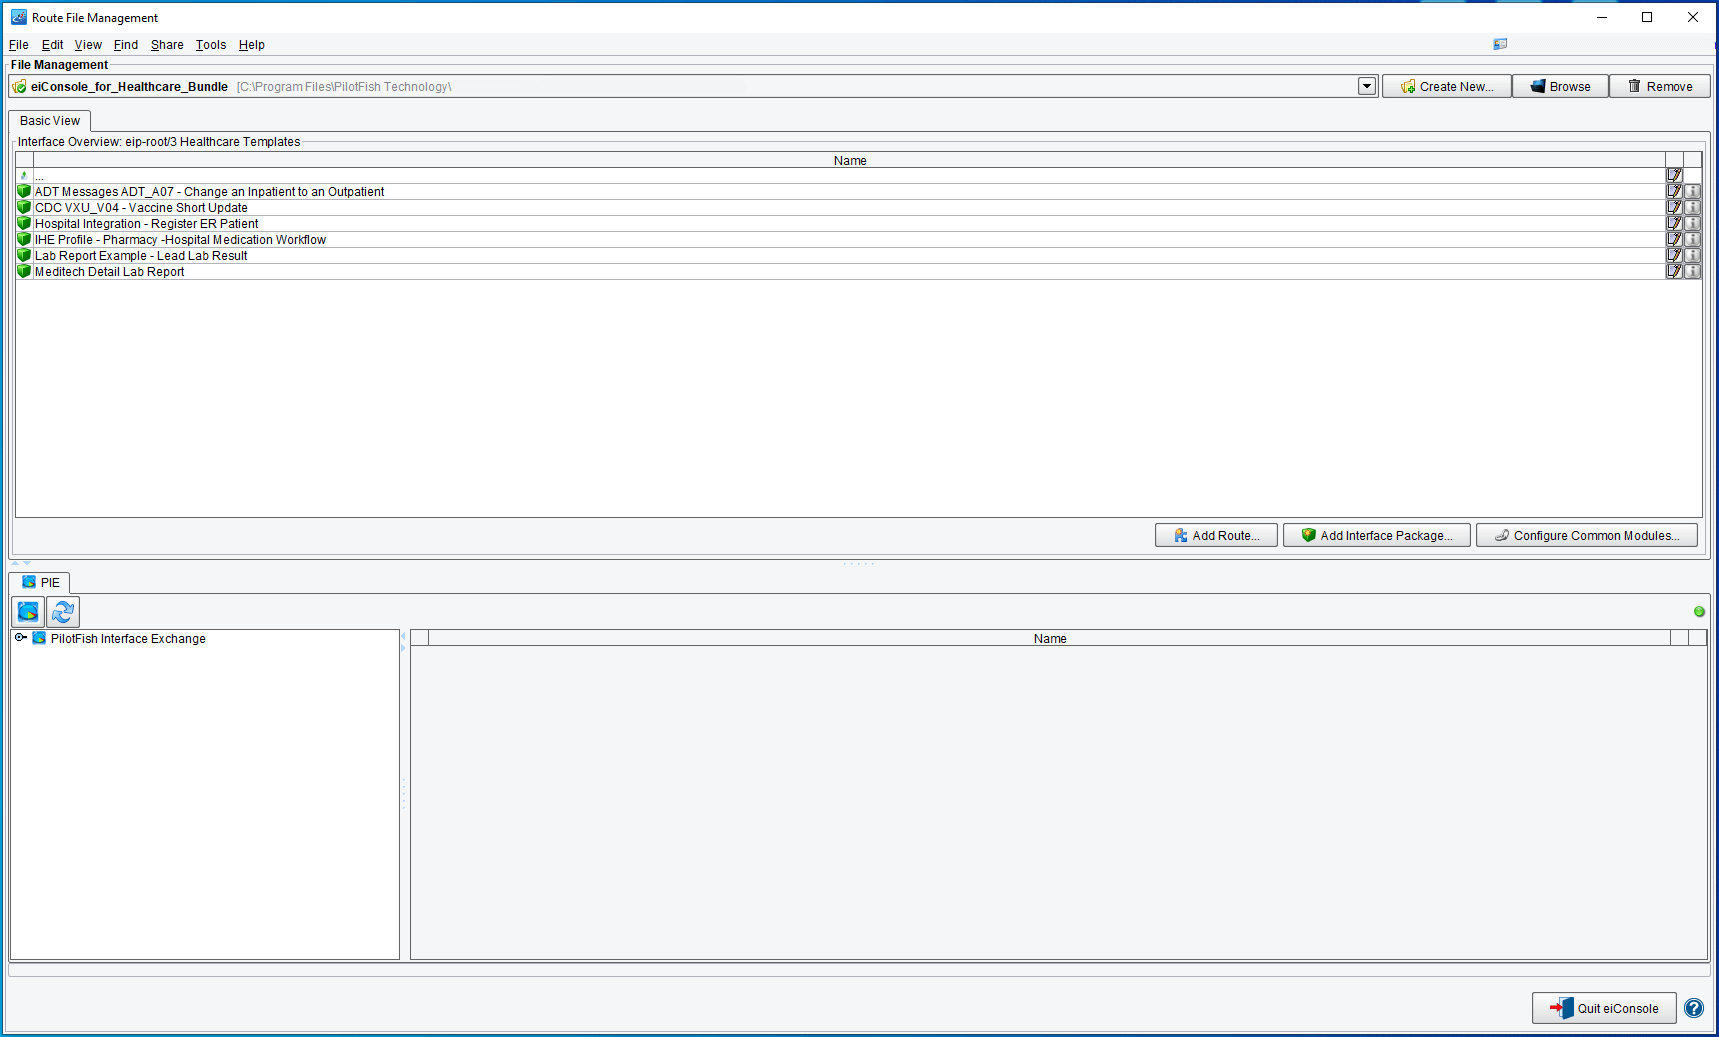
Example 1. Route File Management Screen
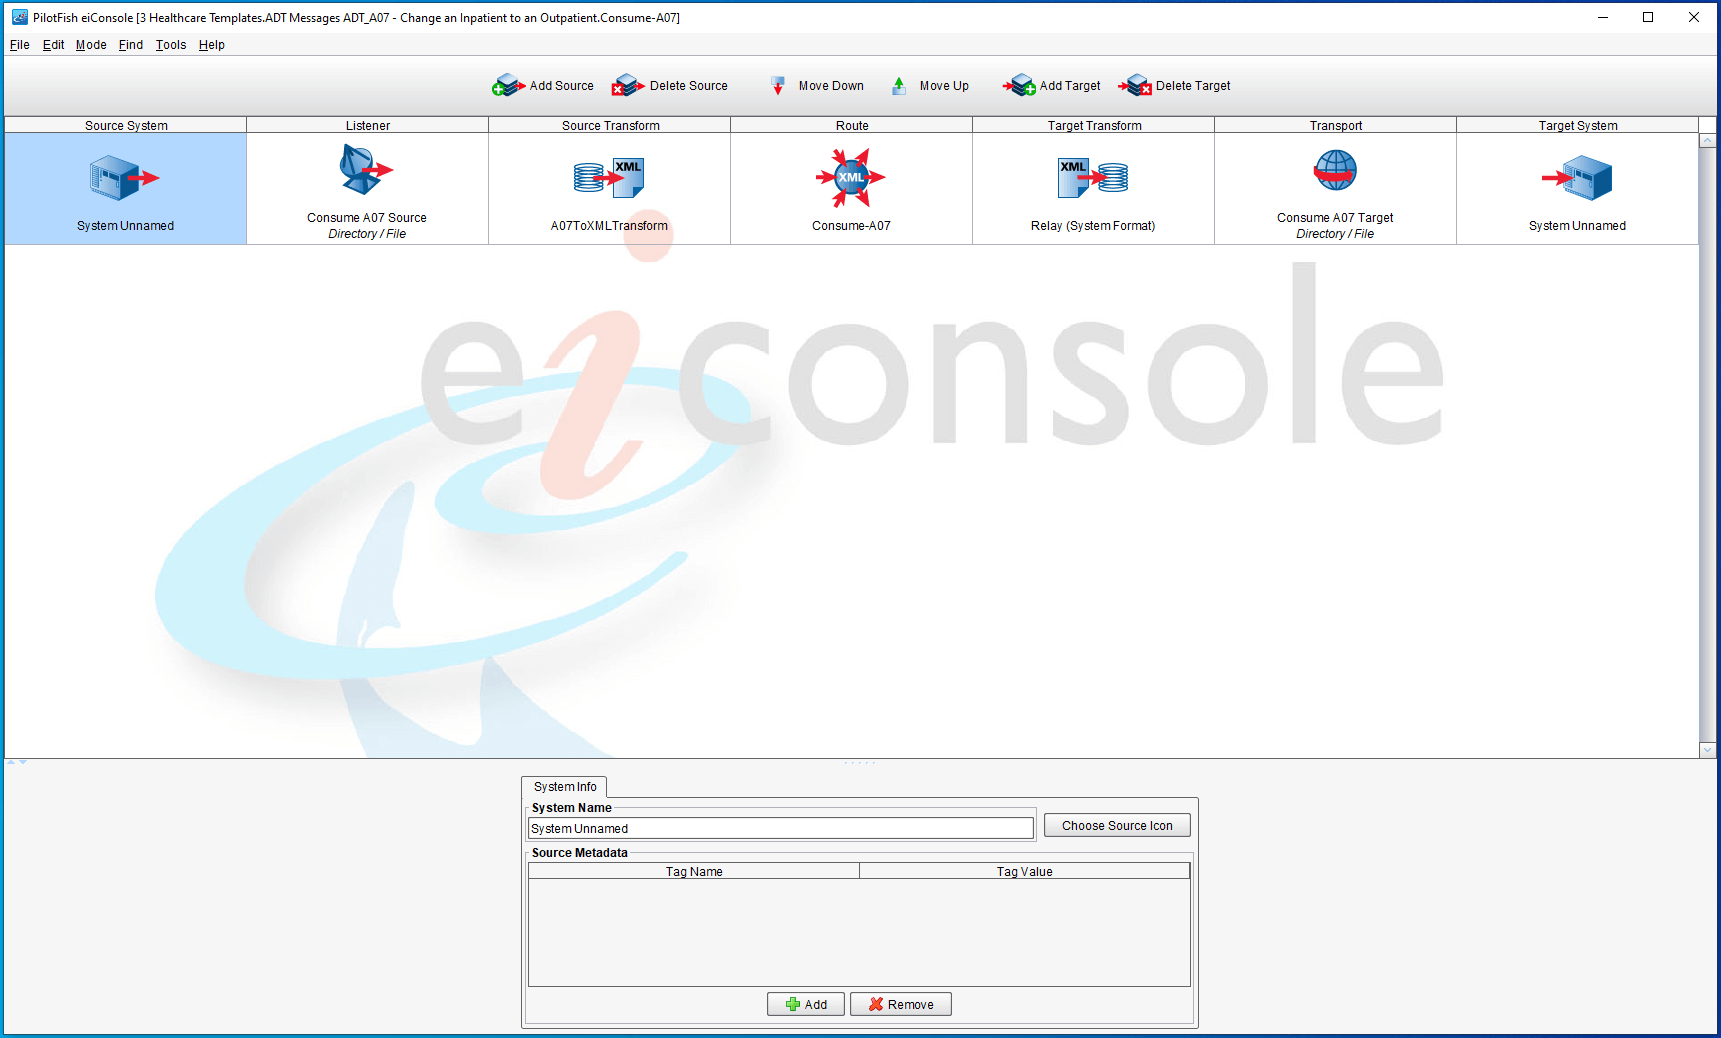
Example 2. Main Route or Interface Configuration Screen
Step 2 – Identify the Source System
Click the “Source System” icon and fill in descriptive information about the system outputting the interface data. This information is user-defined and might include the system name, system owner, format type, etc. Later, this information can be used to search for interfaces maintained in the eiConsole.
Step 3 – Configure B2B Connectivity (Listener)
Click the “Listener” icon (Example 3), select a Listener from the drop-down list, and fill in the configuration information for the type of Listener selected. All of the popular Listeners are supported, including ASW S3 Listener, Database Polling SQL Listener, Directory/File Listener, FTP/SFTP Listener, HTTP Form/POST Listener, HTTP GET Listener, HTTP POST Listener, JMS Listener, RabbittMQ Listener, RESTful Web Service. View the complete list of 40+ Listeners.
You can also configure Processors at the same time; for example, you may want to add a decryption processor from the list of those available. View the extensive list of 140+ Processors available.
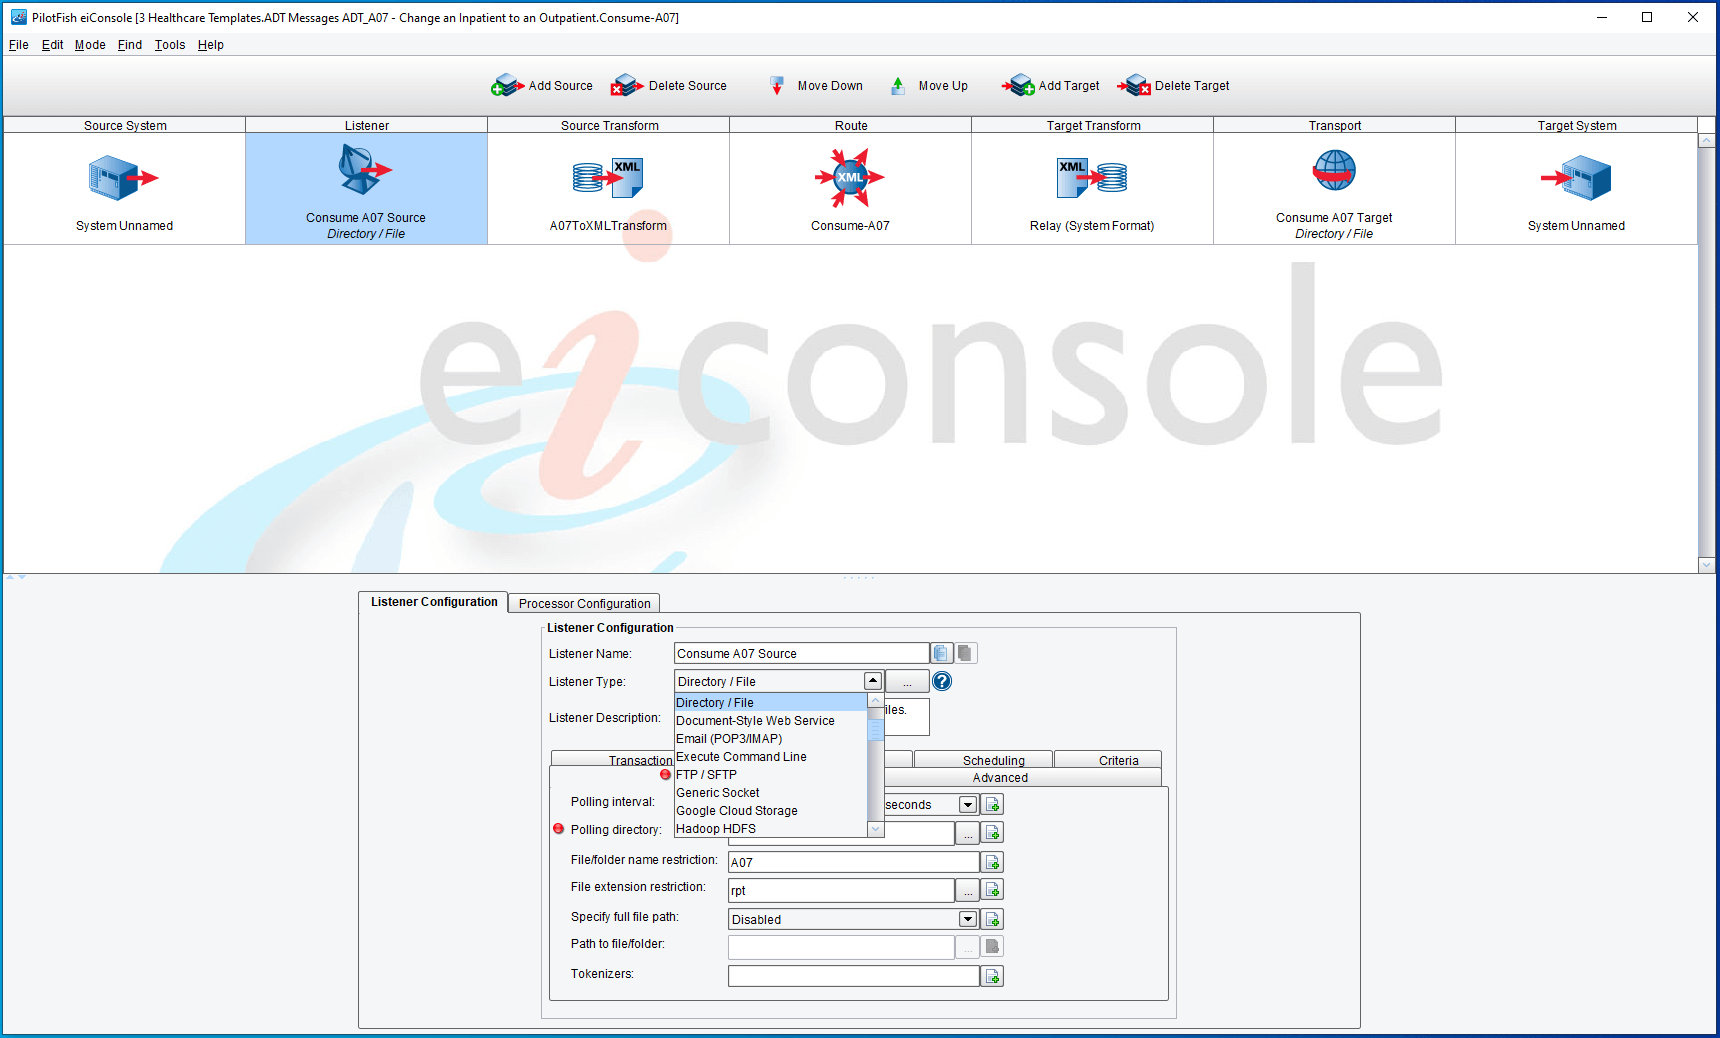
Example 3. Configuring B2B Connectivity
Step 4 – Map the Source Data to the Common XML Standard
The eiConsole supports data transformation using a point, click, drag & drop visual interface. Clicking the “Source Transform” icon presents you with two powerful eiConsole components to enable the transformation of the data format output from the Source System into the common XML standard format. These are the File-to-XML Editor (File Specification Editor) and the Data Mapper.
The File-to-XML Editor lets you import sample data formats and data from the Source System into the File Spec Editor, where it can be visually edited. By clicking “Save,” the incoming interface format is converted to a generic XML format – the first stage in the transformation process.
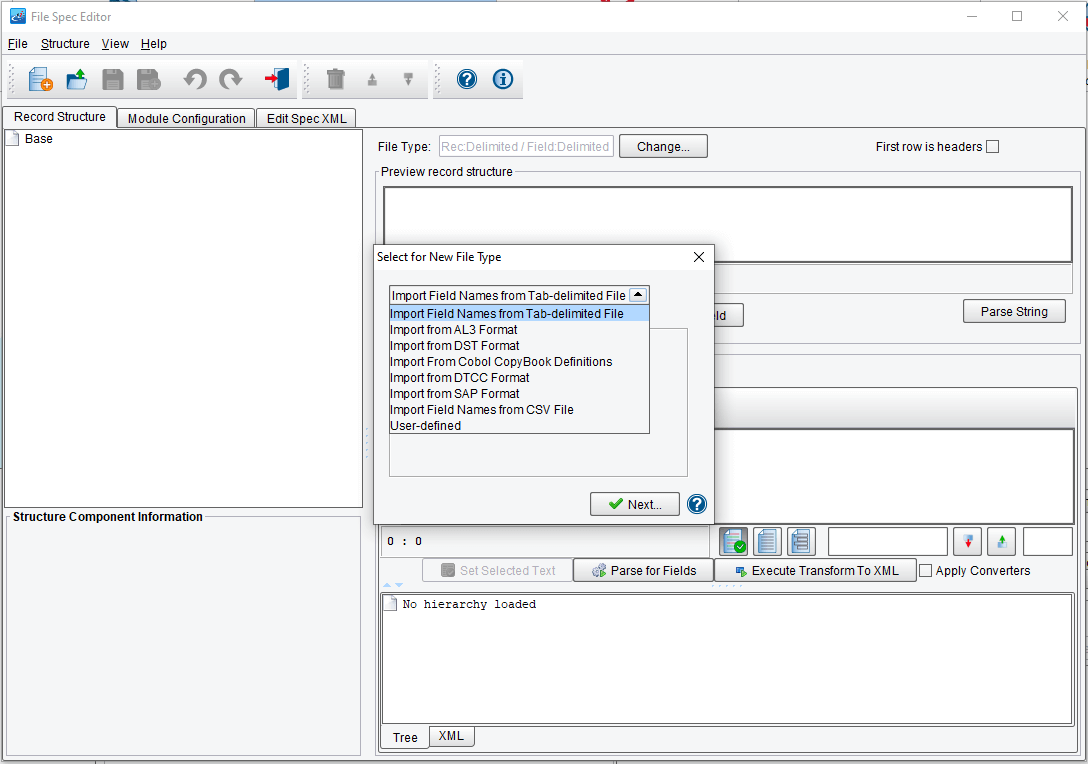
Example 4. File-to-XML Editing
The Data Mapper is then used to generate the XSLT necessary to transform the generic XML format into the industry-standard XML format. This is accomplished by dragging corresponding fields from the Source schema (left column with blue nodes) and the industry-standard schema (right column with green nodes) to a visual map in the middle. Constant values, expressions, tabular mappings, and Java extensions are also supported through the drag & drop interface.
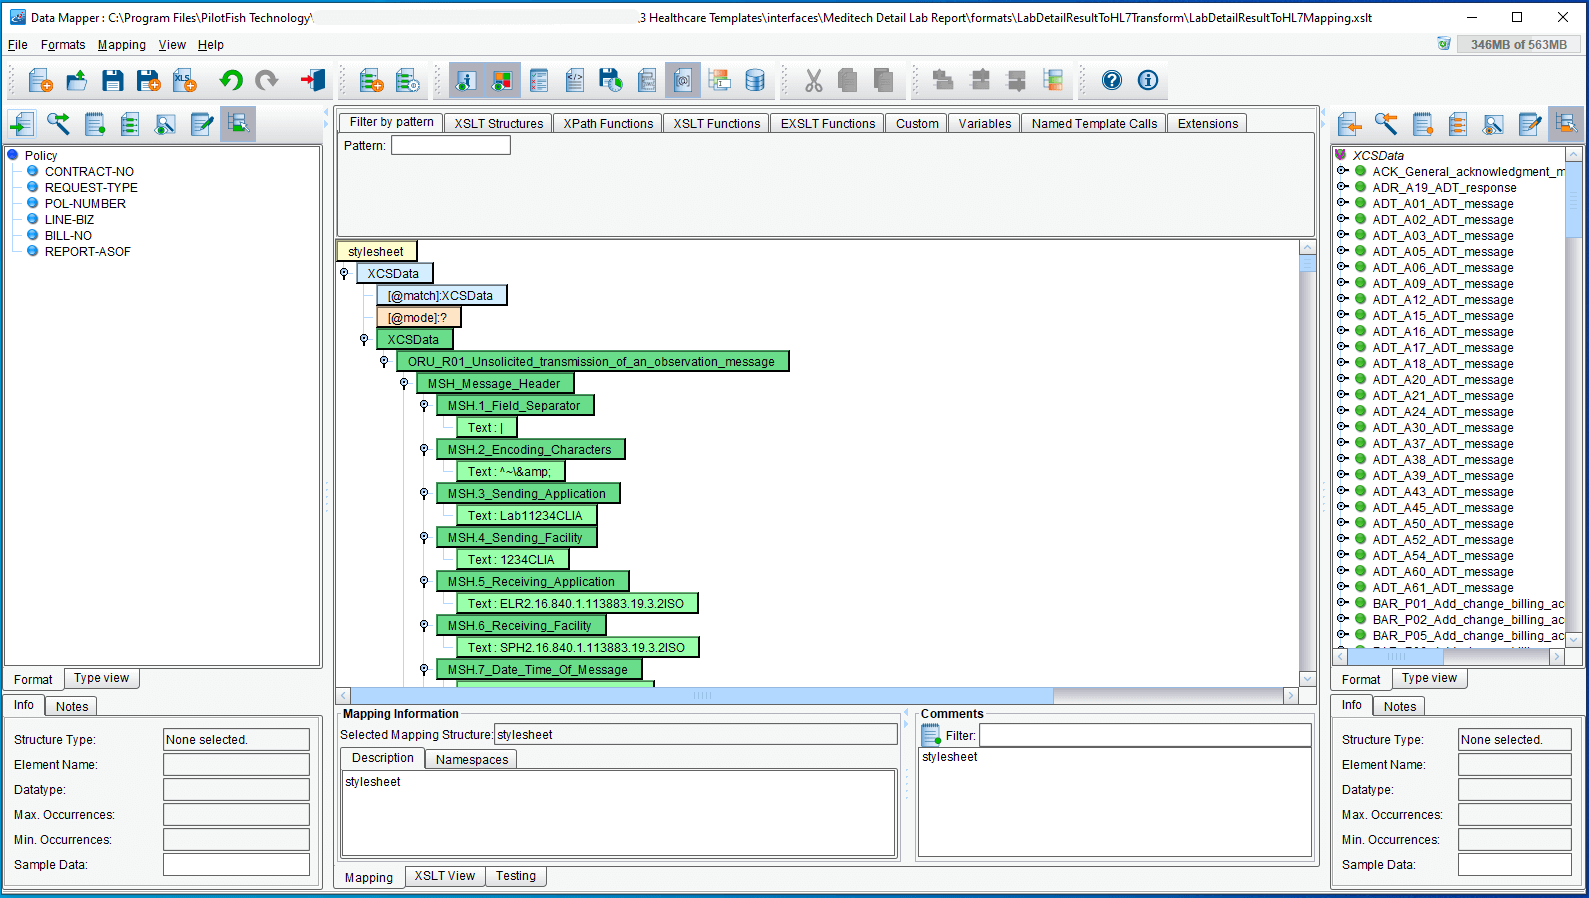
Example 5. Data Mapper Screen
Specific time-saving features of the Data Mapper Include:
- An import feature that lets you read in the Industry schema and its associated Metadata when available (for Example ACORD Schema) directly into the Data Mapper thereby eliminating the need to search external sources for documentation necessary for the data mapping process.
- An import feature that lets you directly import Excel spreadsheets and flat file definitions including associated documentation. No time consuming and tedious custom programming is required.
- Templates for a wide variety of transactions (see Products & Pricing for full list) are included saving thousands of hours that would be spent reviewing implementation guides and custom defining transactions.
- The “import XML format as template” feature lets you automatically load a sample of the Source or Target XML into the Data Mapper making transformations to the desired XML format a simple “drag & drop” exercise.
- Support for mapping recursive elements (for example, multiple Parties differentiated by Role) eliminates the confusing and error-prone process of drawing connecting lines with ambiguous annotations.
- All of the potentially thousands of codelists can be automatically imported and mapped with an intuitive Tabular Mapper saving thousands of hours.
An integrated schema maintenance component allows users to easily manage internal canonical models, derivations of industry standards, and upgrades to new releases of Standards. There are dozens of other features that simplify the entire mapping process. XPath functions are available in the XPath functions tab (Example 6). A set of macros makes it very easy to do common mapping tasks. The Notes tab under the Source or Target tree can be used to annotate any field or structure within the Source or Target formats. This can be useful for tracking questions or documentation provided by a Trading Partner, Business Analyst, etc.

Example 6. XSLT Structures and XPath Tab Options
The Data Mapper can also be used to document the Source and Target formats, as well as to extend those formats.
Under the covers, these mappings are represented as W3C compliant XSLT. The XSLT can be viewed by clicking on the XSLT view tab. The XSLT is fully editable. The editing view includes code completion, and any changes made here will be immediately reflected back on the graphical mapping tab.
Step 5 – Name the Route or Interface
Click the “Route” icon and give your route (or interface) a name, and as much other user-defined information about the Route as you like. You can also specify that Transaction Logging should occur for the production interface by clicking a checkbox.
Step 6 – Map the Common XML Standard Format to the Format of the Target System
Clicking the “Target Transform” icon will again present you with the File Specification Editor and the Data Mapper. This time, however, the purpose is to transform the industry-standard XML format to the format of the Target System. If the Target System is capable of accepting the industry-standard XML, simply click the “Use Direct Relay” checkbox.
Step 7 – Configure the Transport
Click the “Transport” icon, select a Transport method from the drop-down list, and fill in the configuration information for the type of Transport selected. Transport types include these popular delivery options AWS S3 Transport, Database SQL Transport, Directory/File Transport, Email (SMTP) Transport, FTP/SFTP Transport, HTTP POST Transport, JMS Transport, RabbitMQ Transport, RESTful Web Service Transport and Synchronous Response Transport. See the complete list of 30+ Transport Types available.
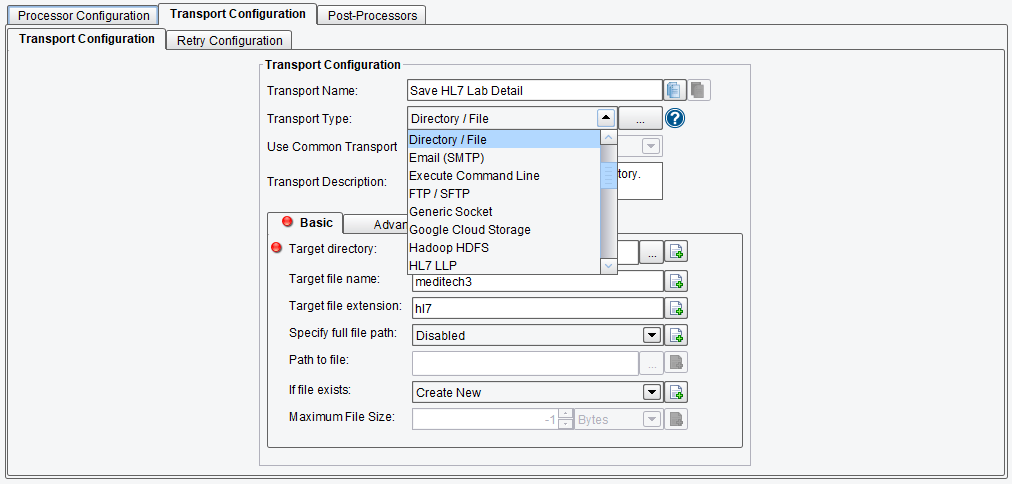
Example 7. Transport Configuration Screen
Step 8 – Identify the Target System
Click the “Target System” (Example 8) icon and fill in descriptive information about the system receiving the interface data. This information is user-defined and can be used later to search for interfaces maintained in the eiConsole.
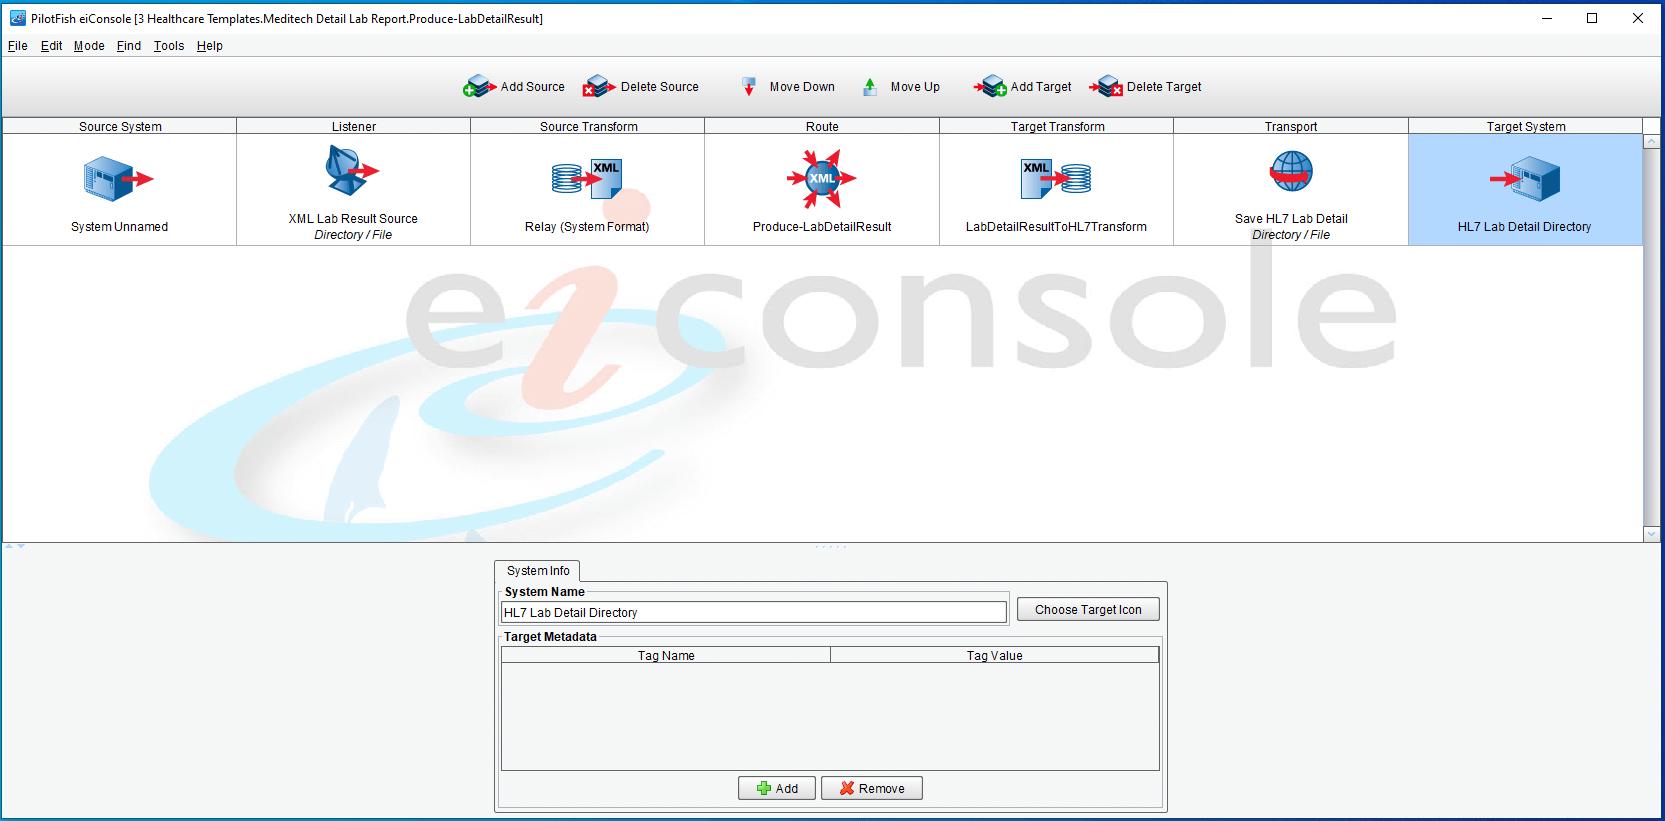
Example 8. Target System Screen
Step 9 – Test the Interface
Feed sample data to your local copy of the newly created interface and step through all of the components you have configured for the receipt, transformation, and delivery process to test the interface. Test (Example 9) any stage in the process and review test results.
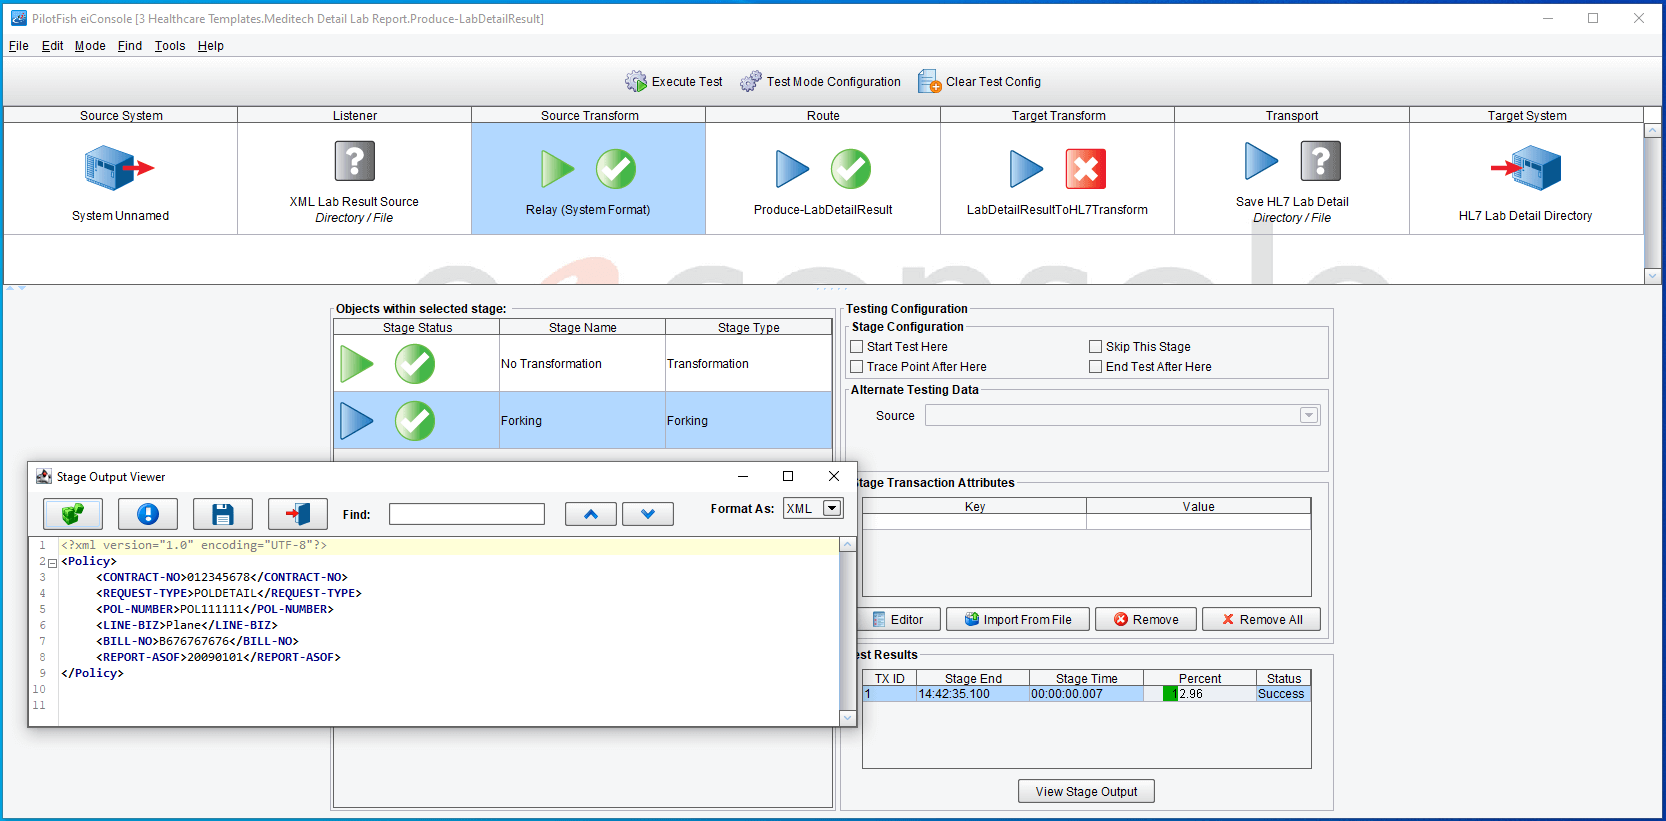
Example 9. Testing Screen
Step 10 – Deploy the Interface to the eiPlatform Server
Click “Commit Route, ” and your interface will be uploaded to the eiPlatform server using a secure web service.